Securly Classroom (Site Lock)
Learn how to configure Securly Classroom settings to only allow specified websites, providing a more controlled and focused experience for students.

Written by Chappy Swearingen
Updated at March 14th, 2024
Table of Contents
Product: Securly Classroom
Audience: Teachers, Test Coordinators
Overview
This document covers how to use Securly Classroom to lock student devices to only allow specific sites. This is especially helpful in testing environments by preventing test takers from looking at unauthorized material.
Tools/Equipment Needed
- Securly Classroom
- List of authorized websites
Preparing Site Lock for Class
- While using the “Limit Tabs” option is helpful for monitoring student activity, using this functionality can be problematic when trying to use Site Lock when launching a Securly Classroom. Please follow the procedures below for best results.
Add a Collection
- If you have not created a collection of the website(s) follow the Video Guide found on the Securly Learning Portal.
- See: Classroom Teacher > 2 - Weblinks and Collections
- See: Classroom Teacher > 2 - Weblinks and Collections
- For a text guide, visit Securly's documentation site: Web Collections
Using Site Lock in Class
Now that you have created a collection, you are ready to use Site Lock in Securly Classroom. You can either launch the class with Site Lock active, or you can activate Site Lock at any time a class is in session.
Option I - Start Class with Site Lock Active
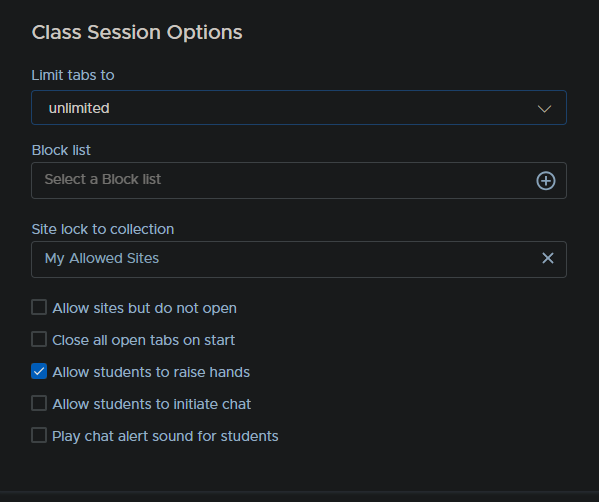
If you want to start the class session with Site Lock active and all the sites in your collection automatically open on the student's device, use these recommend setting:
- Set “Limit tabs” to “unlimited”
- Leave the “Block list” field empty since you will be using Site Lock
- Add your Collection to “Site lock to collection”
- Do not check “Allow sites but do not open”
- Do not check “Close all open tabs on start”
Additional settings are your preference
Closing All Tabs
If you want to close all tabs when class starts, you can push the sites in your collection at any point during class. In that case, it is recommended to check both “Allow sites but do not open” and “Close all open tabs on start”.
Option II - Activate Site Lock in a Class Already in Session
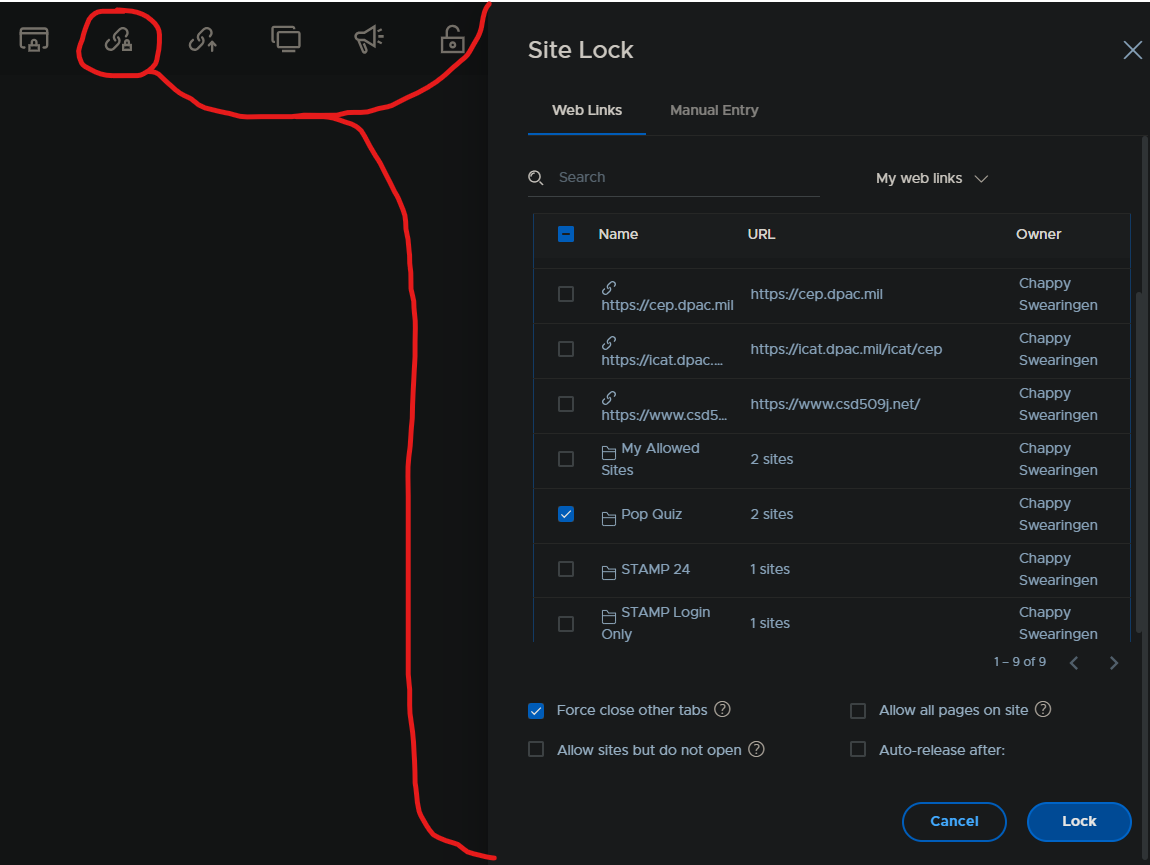
If you already have a Securly Classroom running, you can activate Site Lock by:
- Clicking the Site Lock button at the top of the page
- Select the Collection you want the students to have access to (in this example it's “Pop Quiz”)
- Choose any options at the bottom as is your preference
- Click “Lock”
Site Lock and Open Tabs
“Force close other tabs” does not need to be checked to prevent students from accessing tabs that are already open. Securly will put up a blocked page message until you release Site Lock or end the class session. This will allow students to resume where they left off on those sites before you locked the device into your Collection.
Releasing Site Lock
You can release Site Lock by clicking the “Release” button (open padlock) at the top of the page. If you end a class session, Site Lock will automatically end.
Conclusion
You should now be able to use Site Lock in Securly Classroom to limit access to only the websites you want your students to be able to view. You can also choose to start class with Site Lock active or activate it at any time during a class session.
For instructional/pedagogical questions, please contact your Building Administrator or Student Growth & Experience (SG&E) Level Coordinator.
For technical questions, please contact your building SPOC.